Wednesday, December 18, 2013

Easy Caligraphy Envelopes Tutorial (Cheating Method)


I love the look of hand addressed modern calligraphy envelopes.  Unfortunately, I do not have the skills to address my envelopes like this.  I found a easy way to get around this, it is truly a cheating method but works just as well.  I print out a font very lightly on my computer and go over it with an pen.  This works out so beautifully, and it also helps me practice my calligraphy.  The more I keep tracing these letters the more I get use to the strokes.  I feel like i'm in kindergarten practicing my letters. 
Print your envelope in the lights shade of grey that you can see.


Thursday, December 12, 2013

How to Package your Presents for Mailing


This post brought to you by Duck Brand provided by ShurTech Brands, LLC. All opinions are 100% mine.
I'm proud to say that I have gotten 90 percent of my Christmas shopping complete for this year. The buying part was easy, the mailing part I have not gotten around to just yet.  I always think that how you wrap a present is just as important as whats inside the box.  I participated in an advent swap this year (more to come on that later), but I had to mail 12 small presents to another person selected for me randomly.  I wrapped all her presents medticusly as seen below:


For the out side of the box I really wanted to package it it with something nicer than regular packaging tape. This is where EZ Start Printed Packaging Tape was so handy.  It added some holiday cheer to the outside of an ordinary brown box.  At first I was going to use wrapping paper on the box, but I read on the delivery sites that it's not recomended because the paper may fall off.  This tape was a great way to keep the package secure yet make it look nice.  The tape is strong packaging tape with pretty designs on it..
EZ Start® Printed Packaging Tape is available in the following designs Peppermint, Ornaments, Daisy and Paisley.


Duck Brand® are the makers of EZ Start® Printed Packaging Tape.  They are on Twitter @TheDuckBrand
Remember to stop by and follow @TheDuckBrand for tons of inspiration when you do your holiday packing.

I'd love to see how you use EZ Start Printed Packaging Tape.  Be sure to pin your ideas using hashtag #EZstart
Visit Sponsor's Site

Sunday, December 8, 2013

How to Make Modern Dollhouse Furniture Tutorial

I've gotten a few requests on how to make dollhouse furniture.  I know I mentioned that I would post my instructions but to be honest have been delaying it because I didn't take great pictures when I made the furniture for my daughters dollhouse earlier this year.  Sometimes when I make things I just make it up as I go along, so I also don't have the greatest measurements or instructions.  If you are the type of person that needs exact measurements then this tutorial is not for you.  I am simply going to tell you what I did, but not give you exact measurements.  You can tape the pieces together and adjust as necessary.

Acrylic Egg Modern Chair:
Materials:
Plastic Round ornament that opens in half
Plastic champagne cup (you only need to use the bottom of the cup, the cups need to be the ones with the detachable base)

Use only one half of the ornament and hot glue to the base of the champagne glass.  I also took a piece of fabric to make a cushion for the chair.


Modern Arco Lamp (Arched Metal Ball Lamp)
Materials:
20 gauge wire in silver (16 or 18 gauge would work too)
Plastic Silver Ball ornament (I got mine from Target, you want to buy one that is the same scale as your dollhouse)
Hand saw
Drill

Cut ornament as shown above (a little more than 3/4s of the ornament) with a hand saw.  Use caution when cutting ornament it is thicker than you would think. Use a drill and drill a small hole for wire to loop through.  Attach wire on through hole and bend to make a T shape so wire does not fall thought.  Loop wire to other half of ornament (this is your base).  The base will be too light to support the lamp so add weights to the bottom of base.  I hot glued quarters to the  bottom of my base (if you have kids quarters are a choking hazard, so make sure that the quarters are very secure).
Modern Sofa
Materials:
Kids Play Foam Mat (only one square is needed)
Exacto Knife

Cut our 4 pieces from the foam mat. One for the back of the sofa, two side arms and one for the base of the sofa. 
The back and base of the sofa are the same size, arms are also the same size.  For the arms of the sofa I angled it slightly on one side to create a slight recline on the sofa.  Note how the arms of the sofa needs to be longer (width of base plus depth of base).
Tape your sofa together and adjust measurements if necessary.
Cut out another rectangle shape.  This will the the sofa cushion.  Cut out two more smaller shapes for the back pillow cushions.   Glue only the base together. While base is drying take fabric (I used old grey work pants) and wrap the cushions.  I glued them onto the foam with Aleenes Tacky Glue.

 I don't have pictures on how to glue the fabric onto the foam but you want to make sure that any seems will be in a logical place where they won't be seen.  When base is done wrap base with fabric.  Base is trickier to wrap because you will see more seams.  I made bias strips with the fabric to cover the seams.  For the legs of the sofa glued small wooden pieces to the bottom of the sofa.  Again if this is for small children I would skip this step as it could be a choking hazard.
Pouf was crocheted and rug was a piece of fur that I cut to shape. Semi circle chairs are made of foam and cardboard also.  Will try to post tutorial on that when I have a chance.

Wednesday, December 4, 2013

How to Water Marble Nails and Christmas Ornaments

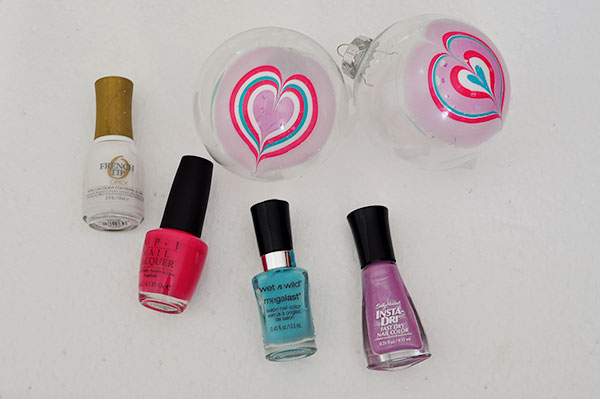
I had so much fun water marbling Christmas ornaments last year, I decided to do it again this year.  This time around I made a heart pattern and used a variety of colors.  I love this craft because it uses everything I already have at home, and its cheap, if I mess up I can simply use nail polish remover and remove the pattern.

Video tutorial found here.
I used Orly French White, OPI Party in My Cabana, Wet n Wild I Need a Refresh Mint, and  Sally Hansen Lovely Lilac.

You can use a clear ornament or an opaque one.  I like the clear ones because you can see the design through different angles.

I water marbled my mails also.  You can also see that tutorial in the videos below.  


Video tutorial for water marbled ornament heart here.

Please check out my other tutorials for fun Christmas ideas:
Salt Dough Gift Tags
Book Page Star Ornament

Kleenex Box Ornament

Monday, December 2, 2013

Holiday Cookies

This post brought to you by Walmart. All opinions are 100% mine.
Making Holiday Cookies with my daughter has become a tradition in our house.  The best part about cookie making for us is not eating them, but we love to decorate them and give them out.  The smell of holiday cookies in our house really sets the stage for the wonderful holiday season ahead.
Did you know that Walmart on their website links inspire and assist with the holiday baking and entertaining? The site includes fun festive cookie recipes, coffee preparation tips, and great deals on the brands you need for your best baking. To help prepare for holiday entertaining and gifting there are even how-to videos to guide you through the holidays with ease. Also, Walmart carries trusted, quality brands such as Smucker’s®, Jif®, Pillsbury®, Eagle Brand®, Crisco®, Hungry Jack® and Folgers® so you know you are using the best ingredients. Whether you are creating a traditional favorite cookie, or trying something brand new, this site has helpful tips for you.
This year we made gingerbread cookies.  My daughters were so excited about this.  They were so excited to decorate the gingerbread men and put faces on them.  They aren't the prettiest cookies, but I the people we give them to know that they were made with love.


Sunday, December 1, 2013

New Rainbow Loom Pattern Tutorial: Inverted Fishtail and Double Inverted Fishtail Bracelet

Here are two new Rainbow Loom patterns with video tutorials.  I didn't realize that my videos were not viewable via mobile devices so I've included a link to each video instead of embedding the video into the post.

The inverted fishtail and the double inverted fishtail can be both made without a rainbow loom.  The double inverted fishtail is a bit easier on a loom, but still doable without a loom.  I've been making so many bracelets I've run out of rubber bands.  I ran to Target during lunch to pick up some (read on a forum that Target had them at the dollar spot), but when I got there there was only one open pack left.  So if you are in the market for rubber bands try Target's dollar spot, maybe yours will have it.  I think the pack was 300, but I didn't buy it because half the rubber bands in that last pack were scattered in the bin.

I was actually looking to buy these gold rubber bands on Amazon.  They seem really cool to make bracelets out of.  I usually get my online craft supplies from Consumer Crafts (their rubber bands are pretty cheap only a dollar some for 300 rubber bands), but they don't have the gold ones.  There are some cool glitter ones and glow in the dark ones that I ordered.  Their Rainbow Loom is relatively cheap too, compared to Michaels.  

I heard that the Rainbow Loom is flying off the shelves and on the top of every child's Christmas list (both boys and girls).  Yes, this was completely surprising to me that boys are into this also.  I love this loom for kids because it stimulates the brain thinking of new patterns.  It also is so much better than sitting in front of the TV or computer. 

Inverted Fishtail Rainbow Loom Bracelet.


Double Inverted Fishtail Rainbow Loom Bracelet

Here is the video on how to make a Inverted Rainbow Loom Bracelet (I show you how to do it without a loom): https://www.youtube.com/watch?v=Jv7mg3RrfeA
Here is the double inverted fishtail bracelet video tutorial: http://www.youtube.com/watch?v=_lyoK1K8tYg


disney princess toy video
Pin It button on image hover