Thursday, February 21, 2013

Upcycling My Husband's "Dam" TShirt Into a Baby Onesie/Gown


I made these onesies years ago (way before I started blogging) for Avery.   It was a great way to reuse my husband's "dam" shirt, that he could no longer fit (see image below to get the joke).  It took me a while to find the original tutorial that I used but I this is it: http://thismamamakesstuff.com/tutorial-rockin-baby-gown-t-shirt-refashion/.  While I was searching for the instructions I used I found this one: http://knitnatak.blogspot.com/2012/01/t-shirt-onesie-tutorial.html I like this one because it uses the original tshirt collar.  The first tutorial has you sew cut out the original collar and hem it with a zig zag stitch, which I found to be rather challenging.  If you use the first tutorial again I would put bias tape on the colar to make it look more finished.
Alexis's dam shirt now.

This is another one of my husbands shirts that he wore back in his youth.


The gown is getting on the short side for Alexis,  maybe I'll cut it shorter and make it into a baby t.


Wednesday, February 20, 2013

How to Find an Apartment +25 Dollar Visa Gift Card Giveaway!


This is a Sponsored post written by me on behalf of apartments.com. All opinions are 100% mine.

When I was renting a few years ago, finding an apartment was always so tedious.  I would look at a bunch of different sites, some that didn't have images and have to filter the search myself. Apartments.com makes the search much easier.  The website is easy to traverse and the search results comes back with so many relevant apartments.   Apartments.com also has mobile app available for the iPhone, iPad and Android devices.  This makes apartment hunting a breeze.
I hate it when I go on websites and the search is slow and the results are not relevant.  This is never the case with Apartments.com.  The search filter is awesome and for some of the apartments returned there are actually discounts that can be printed!  The search features relevant images as well as floor plans.  This is a great feature that any renter would want before actually looking at the place.  I also love that they have user reviews, who wouldn't want to see experiences of previous tenants?
 Next time you have to search for an apartment, be sure to check out Apartments.com, it will make your experience enjoyable.
Now for the 25 dollar Visa Gift Card Giveaway.
To enter this giveaway simply:
Leave a comment on this post telling me which apartment from apartments.com you would choose.  Include the link of the apartment. (Remember to leave an email address where you can be reached)
Additional entry: Tweet @aptscom telling us which apartments you love!  Include #AptsWin in your tweet.
Giveaway ends March 5, 2013 at 12PM PST.
 photo Apts_PrfctFit_rgbjpg_zpsf00a594a.jpg


My Little Pony Fashion Spa Day with Elsa and Ariel too
https://www.youtube.com/watch?v=2os_1UVecwc

Frozen Fever Fashion Show with Elsa, Anna and Ariel
https://www.youtube.com/watch?v=FGioMsDFPJU

Japanese Eraser Collection with My Little Pony Pinkie Pie
https://www.youtube.com/watch?v=TpaNLkecT54


Tuesday, February 12, 2013

Non Candy Valentine's Day Ideas

This is the first year Avery is in school, so it's the first time I needed to make Valentines for her classmates. I wanted to give out something that is not candy, because she get enough candy nowadays (yes, I am the house that gives out pretzels for Halloween).  Don't get me wrong, Avery eats candy, every time my husband goes to the bank, he comes back with a lollipop for her.  But coming back with twenty small bags of candy, that will sit in our pantry, I just find it a waste. 

I saw this idea on Pinterest to give out Clementine "Cuties" and loved it.  I decided to make my own labels and even put Avery's name in dot traceable penmanship font so she could practice writing her name.  That was probably my best idea ever.  It's usually like pulling teeth making her practice her writing, but with these labels, she eagerly wrote her name twenty times without complaining!

If you want to print make these I have attached my label that I used:

You can add the traceble penmenship font for your childs name using photoshop.  Free font found here: http://www.fontspace.com/p-j-cassel/trace-font-for-kids


Avery is actually smiling writing her name!

To put the label on I staple the back onto the plastic bag and then use double stick tape to adhere the front.  When you do it this way you won't be able to see staples in the front.


Here are some other great Valentine's Day ideas that are not candy:

Play-Doh Valentines

Pencil Valentines

Ruler Valentines

Toy Animal Valentines


Tuesday, February 5, 2013

Does Adding Cornstarch to Nail Polish Make it Matte?

I've tried using Pam to dry my nails (which does not work, you can see my post here). So when I saw this pin all over Pinterest, I decided to put it to the test.  Add cornstarch to clear nail polish to make a matte polish.  Use it as a top coat for any nail polish.    I've seen lots of cool pictures where people do a french manicure using half glossy and half matte.  I always wanted to try it but never got around to buying matte polish.  This was the perfect opportunity to see if this Pinterest recipe actually works.

I say recipe loosely because if you see the link there isn't any measurements on how much cornstarch to nail polish.  For my experiment I started off with 1/4 teaspoons of cornstarch to one bottle of clear nail polish.  To put the cornstarch into the bottle I made a little paper funnel.  I found that 1/4 teaspoons was too little and ended up using approximately one teaspoon of nail polish.  One additional thing to note is that if your bottle of polish is full you need to pour out some polish to get one teaspoon of cornstarch in there.  You want to also do this on a protected surface because it gets a little messy.  I also used a small chopstick to push the cornstarch into the polish.

The entire process was pretty messy (but easy to clean up, because its only cornstarch, as long as you didn't spill the polish).  So to results of my new matte clear coat?   Marginal Pass.

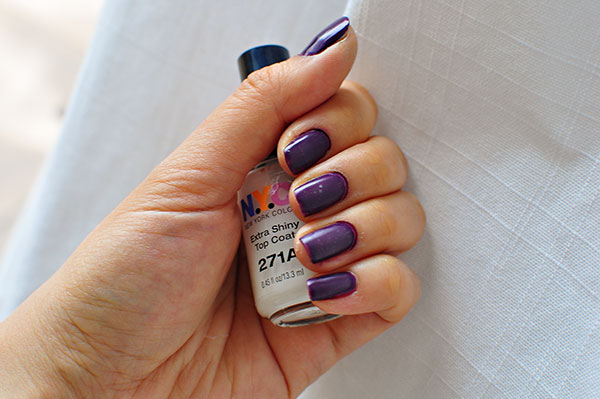
Cornstarch added to clear nail polish does make it more matte.  But not a matte that is true to color.  The matte is more of a cloudy matte.  It does have a unique look to it, but not anything that I would waste a bottle of good clear coat polish on.

I have read on other forums that you can add cornstarch directly to colored nail polish to make it matte.  This may work out better, but after this test I'm hesitant to try.  Other forums said that a lot of brands now make matte top coats that are really great.   So for the effort I would say, don't try this at home.  It is not worth it.

Have you tired this before with better results?  I would love to hear your experiences.


I used a cheap top coat nail NYC nail polish.
Make a funnel from any paper and do this on protected surface.
The cornstarch does get everywhere and can overflow your bottle if you have too much polish.  So remember to dump out some polish if your bottle is too full.


Looks pretty cool as it goes in the bottle.  Reminds me of the Brain Hemorrhage cocktail.

Shake up the nail polish really good.

Here is the matte polish painted on my middle finger and pinky finger.  You can see it does make it matte, but a little cloudy.

I changed my nail polish 3 times to test different colors as a base.  This one had some bubbles from where the corn starch didn't completely mix.  You can see the cloudiness better here.


With a light base you can't really see the matte.


Sunday, February 3, 2013

How to use Pinterest with Google Reader

I love Google Reader and have been getting more into Pinterest.  I use Google Reader to read all the blogs that I subscribe to.  The problem is that when Pinterest first came out there was no support for Google Reader.  I never really looked into it again, until recently.  I just found a Bookmarklet that could pin through Google Reader.  Here is the link /https://foundthis.co/bookmarklet/.  Now I can read and pin all at once!  Yay!   The bookmarklet doesn't let you choose the image like the pin it bookmarklet, but its better than nothing.  I hope this post helps you as much as it helped me.

BTW, if you would like to find me on Pinterest  here: http://pinterest.com/thecheesethief/.  I also have a button on the side bar, under my facebook button.

Happy pinning! If you also are interested in adding Pinterest Buttons directly onto your blog images, Kevin and Amanda have a great tutorial.


Friday, February 1, 2013

Loom Knit Reusable Green Wrapping for Presents

Have you ever tried knitting before?  I'm not very good at knitting, so I was hesitant to try loom knitting.  Loom knitting is so much easier than regular knitting!  I made this project accidentally, when I was trying to make a kid's hat but the loom I used was too small.  

I love this wine sleeve because its reusable.  I always am bringing wine for dinner parties, but never know how to present it to the host.  This wine sleeve is one of my favorite ways to present wine anything that comes in a cylindrical container. Not only is is very personal, it also is green, and can be reused by the receiver.  

There are tons of great tutorials on youtube for loom knitting.  I used a 5.5 inch loom that I received from ConsumerCrafts.com, you can also purchase the loom from amazon.  The basic steps for loom knitting is wrapping the yarn around each peg and the using the loom hook bringing the yarn over.  


I doubled up the yarn to give a fuller look.

Here is the amost finished loom.  The hardest part on loom knitting is ending the project.  There are a few ways to finish/ cast off the yarn, this is one tutorial that I like. 

To personalize the wine wrapping I used my favorite rubber stamps to stamp a sign and stamped onto a ribbon a "please reuse me" sign.  


Stitch label onto the back of the wine sleeve.

You could also use this sleeve for a mason jar.  I filled this one with Blue Bottle Coffee Beans (world's best coffee). 

Pin It button on image hover